Master the Microwave Sweet Potato: Pro Tips for a Perfect Spud
The sweet potato, a vibrant and versatile root vegetable, has long been celebrated for its nutritional prowess and naturally sweet flavor. Rich in vitamins, fiber, and antioxidants, it’s a healthy addition to any meal. While a slow-baked sweet potato certainly has its charm, the reality of busy schedules often leaves us yearning for a quicker, more convenient solution. This is where the mighty microwave steps in, transforming a long wait into a mere matter of minutes. Forget the notion that microwaves are only for reheating leftovers; for vegetables, especially the humble sweet potato, it's a culinary game-changer. This comprehensive guide will equip you with the pro tips and tricks to achieve a perfectly cooked, fluffy microwave sweet potato fast and fluffy in 10 minutes, every single time.The Unsung Hero: Why the Microwave is Your Sweet Potato's Best Friend
In the realm of quick and healthy meal preparation, the microwave often gets an unfair reputation. However, when it comes to cooking vegetables like sweet potatoes, it truly shines. Its speed and efficiency make it an ideal choice for a variety of scenarios:- Unbeatable Speed: Imagine a perfectly tender sweet potato ready in under 10 minutes, rather than the 45-60 minutes required by a conventional oven. This makes it perfect for quick weeknight dinners, last-minute side dishes, or even a healthy snack.
- Energy Efficiency: Microwaves generally consume less energy than a large oven, especially when cooking a single item. This is not only good for your utility bill but also helps keep your kitchen cool during warmer months.
- Nutrient Retention: Due to shorter cooking times and the use of minimal water (or no water at all), microwaving can help preserve more of the sweet potato’s delicate vitamins and minerals compared to other methods that involve longer exposure to heat or submergence in water.
- Ultimate Convenience: It’s a hands-off approach. Once you pop it in, you're free to attend to other tasks, making it ideal for busy individuals and meal prep enthusiasts.
- Versatility: A perfectly cooked microwave sweet potato can be a standalone side, the base for a hearty meal, or even a component in more complex dishes.
While microwaving might not be the go-to for every culinary task, its benefits for cooking vegetables are undeniable. For a delicious and nutritious microwave sweet potato, it's often just as good, if not better, than other methods.
Your Step-by-Step Guide to Microwave Sweet Potato Perfection
Achieving that ideal fluffy interior and tender texture with your microwave sweet potato is remarkably simple, but a few key steps make all the difference.Selecting Your Spud
The journey to a perfect microwave sweet potato begins at the grocery store. Opt for a medium-sized sweet potato, ideally weighing around 7 ounces. This size cooks most consistently and quickly. If your potato is larger or smaller, be prepared to adjust the cooking time accordingly. Look for firm, unblemished potatoes without any soft spots or green tints.
Preparation is Key
- Wash Thoroughly: Give your sweet potato a good scrub under running water to remove any dirt. There's no need to peel it – the skin is not only edible but also packed with fiber and nutrients.
- The Crucial Pierce: This step is non-negotiable! Using a fork, pierce the sweet potato's skin 4-5 times all around its surface. This allows steam generated during cooking to escape, preventing a messy (and potentially dangerous) potato explosion in your microwave.
- Placement: For optimal results, place the pierced sweet potato directly on a paper towel in the center of your microwave turntable. The paper towel helps absorb any moisture that might release during cooking and ensures a cleaner microwave.
The Microwaving Process
Microwaves vary in power, so consider these times as a starting point, especially for your first microwave sweet potato attempt:
- Initial Cook: For a medium (7 oz) sweet potato, microwave for 2-3 minutes on one side.
- Flip and Continue: Carefully flip the potato and microwave for another 2-3 minutes.
- Check for Doneness: The ultimate test is how easily a fork can pierce the flesh. If it slides in with little resistance, your potato is ready. If not, microwave in 1-minute increments, flipping each time, until it reaches your desired tenderness.
Pro Tip: When microwaving, it's always better to *undercook slightly* and add more time than to overcook. An overcooked potato can become rubbery or tough, but an undercooked one can always be popped back in for a bit longer. If you’re cooking multiple potatoes, place them a few inches apart. For larger potatoes, like two 12-ounce spuds, you might find that 4 minutes on the first side and 3 minutes on the second side yields perfectly tender results, depending on your microwave's wattage.
Resting and Serving
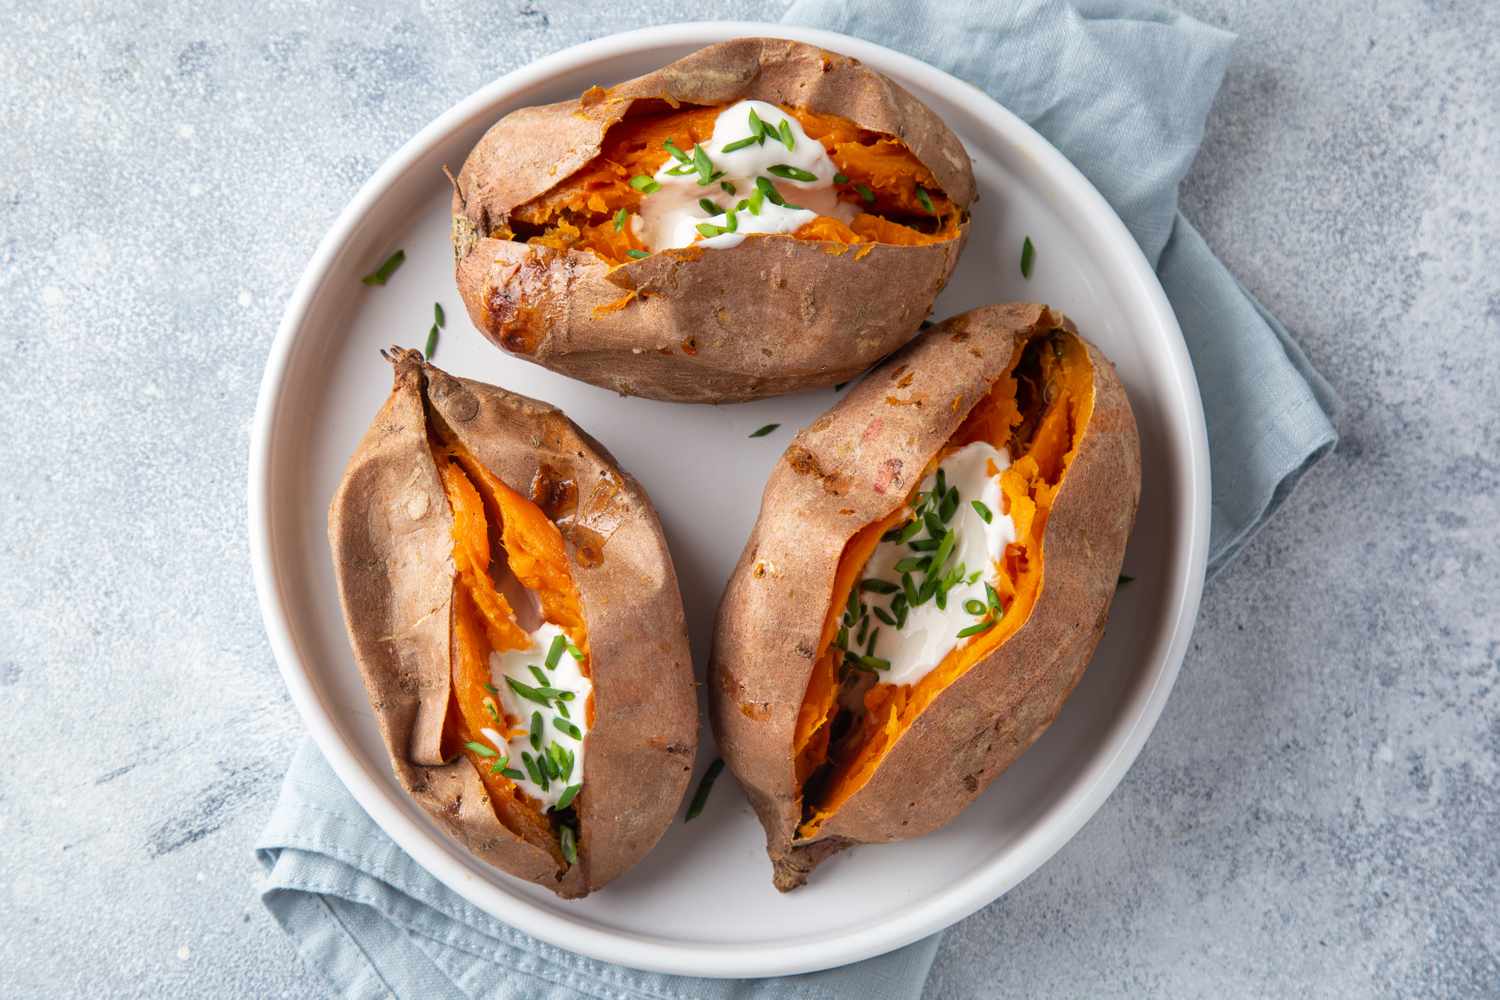
Once your sweet potato is cooked to perfection, carefully remove it from the microwave. Allow it to rest for a minute or two. This brief resting period allows the internal temperature to equalize, further steaming the potato and ensuring an even texture. Then, simply slice it open, fluff the interior with a fork, and get ready to add your favorite toppings.
Beyond Basic: Elevating Your Microwave Sweet Potato with Toppings
The beauty of a microwave sweet potato lies not just in its ease but also in its incredible versatility. It serves as a blank canvas for a myriad of flavors, transforming from a simple side dish into a gourmet treat or a hearty meal. This is where you can truly unleash your culinary creativity. For even more ideas, check out this guide on creative toppings for your microwave sweet potato.Sweet Sensations
Naturally sweet, the sweet potato lends itself beautifully to dessert-like toppings:
- Classic Comfort: A dollop of melted butter, a sprinkle of ground cinnamon, and a drizzle of honey or maple syrup.
- Brown Sugar & Pecan: A pat of butter, a tablespoon of brown sugar, and toasted pecans for crunch.
- Marshmallow Melt: A handful of mini marshmallows, microwaved for an extra 10-15 seconds until gooey and golden.
- Fruity & Fresh: A spoonful of Greek yogurt topped with fresh berries or a warm fruit compote.
- Coconut Dream: A drizzle of coconut milk, a sprinkle of toasted coconut flakes, and a touch of agave.
Savory Delights
Don’t limit yourself to sweet; the savory side of a microwave sweet potato offers endless possibilities:
- Mediterranean Twist: A drizzle of extra-virgin olive oil, crumbled feta cheese, Kalamata olives, sun-dried tomatoes, and fresh oregano.
- Southwest Fiesta: Black beans, corn, salsa, a dollop of sour cream or Greek yogurt, and slices of fresh avocado. A squeeze of lime juice takes it to the next level.
- Hearty Chili Spud: Leftover chili, topped with shredded cheddar cheese, a dollop of sour cream, and fresh cilantro.
- Garlic & Herb: Melted salted butter, a generous sprinkle of garlic powder, smoked paprika, cumin, black pepper, and fresh chives. Finish with grated Parmesan cheese.
- Breakfast Builder: Top with a fried or poached egg, crispy bacon bits, and a sprinkle of chopped scallions for a satisfying start to your day.
- Curried Creation: A swirl of coconut milk, a pinch of curry powder, a sprinkle of red pepper flakes, and fresh cilantro.
Microwave Sweet Potato FAQs: Your Burning Questions Answered
We’ve covered the how-to, but let’s address some common questions that often arise when cooking a microwave sweet potato.Should I peel the sweet potato before microwaving?
No, you absolutely don't have to! The skin is completely edible, rich in fiber, and packed with nutrients. Simply wash it well before cooking. Many people prefer to eat the skin for its added texture and health benefits.
Can I use this method for regular potatoes (e.g., Russet, Yukon Gold)?
Yes, this method works beautifully for regular potatoes too! However, regular potatoes might require slightly longer cooking times than sweet potatoes, so always check for doneness with a fork. For the fluffiest texture, opt for Russet potatoes. If you prefer a creamier consistency, Yukon Gold varieties are an excellent choice.
Why do I need to pierce the skin with a fork before cooking?
Piercing the skin is a crucial step to prevent the sweet potato from exploding in your microwave. As the potato cooks, steam builds up inside. The small holes allow this steam to escape safely, ensuring an intact and perfectly cooked spud.
How long can I store leftover microwave sweet potato?
Cooked sweet potatoes can be stored in an airtight container in the refrigerator for 3-4 days. They make for excellent meal prep components or quick additions to other dishes.
What's the best way to reheat leftovers?
To reheat a cooked sweet potato, place it in the microwave (covered) and heat at 50% power in short bursts (30-60 seconds) until warmed through. Lower power prevents it from becoming rubbery.
Can I turn leftover microwave sweet potato into something else?
Absolutely! Leftover microwave sweet potato is incredibly versatile. You can easily mash it with a little butter or milk for a quick side dish, incorporate it into soups or stews for added creaminess and nutrition, or even use it as a base for sweet potato patties or fritters.
Tips for Success: Mastering Your Microwave Sweet Potato
To truly master the art of the microwave sweet potato, keep these expert tips in mind:- Know Your Microwave's Wattage: Microwave power levels vary significantly. If your potato isn't cooking as quickly as expected, your microwave might have a lower wattage. Adjust cooking times in small increments until you find what works best for your appliance.
- Don't Be Afraid to Add Time: It's a common mistake to undercook due to fear of overcooking. Remember, you can always add more time, but you can't undo an overcooked, dry potato. Start with the suggested times and extend as needed.
- Rotate for Even Cooking: While most modern microwaves have turntables, if yours doesn't, manually rotate the potato halfway through cooking to ensure even heat distribution.
- The Power of the Rest: Don't skip the brief resting period after cooking. It allows the internal heat to distribute evenly, resulting in a more uniformly tender potato.
- Experiment with Sizes: Once you're comfortable with medium potatoes, try larger ones. Just remember to increase cooking time and check frequently. Small sweet potatoes or sweet potato "fries" can also be cooked in the microwave, though they'll require much less time.
- Get Creative with Seasoning: While plain is perfectly fine, a simple sprinkle of salt or a brush of oil before cooking can enhance the flavor of the skin.
The microwave sweet potato is a testament to how simple, healthy, and delicious food can be. It’s a fast-track to a nutritious meal or side, requiring minimal effort and delivering maximum flavor. By following these pro tips, you're not just cooking a sweet potato; you're unlocking a world of culinary possibilities, making healthy eating accessible and enjoyable, even on the busiest of days. So, go ahead, grab a spud, and let your microwave work its magic!
